
I'm not gonna lie, I don't really understand the whole concept behind the term "meta" but I think it just means things that are self-referential. With that, I thought I would use my first actual post to reference the blog itself and do a quick tutorial of sorts about how I created the blog (the header and the social media buttons).
The Header
The header was a fun project using a few tricks in photoshop and a little patience. Most of what I do is a combination of things I picked up from other blogs or youtube videos so when appropriate I will try and give credit to those folks as well.
Starting Out
So how did this thing come to be? First I opened a new document in Photoshop and sized it to 910 by 200 pixels. You may need a different size based on your blog, so you might need to play around with it a little. I kept the background transparent because in the end result, if you save the image as a PNG you can see the background of the page behind your header. On mine, it means the "torn parchment" looks like it's floating and you don't get an ugly white square around it. Even though it's transparent to start with, go ahead and use your bucket tool to fill in the background with white. You'll delete this at the end, but you want a background so you can see the work in progress.
Floating Torn Parchment Paper
This is a crazy easy process that I wish I had known sooner. I'll make this a step by step just to make it cleaner:
- Create a new layer. You'll want to work with a few layers on this project, which makes sense since I was going for a "scrapbook" sort of look with this.
- Change your foreground color to f3d39b and your background to bb8d3e. They should look papery.
- Go to Filter -> Render -> Clouds
- Go to Filter -> Filter Gallery. You're going to want the last tab for "Texture" and select "Texturizer." On the right you should see some options, click the tag for texture and select "Sandstone." Set the scaling to 200% and the relief to 1. Click OK and you have paper! You can stop here or keep going to tear it up.
- A lot of places online try to tell you to use an eraser and take off the edges and let me just say, that looks like crap. Instead, I found these really cool "torn paper" brushes that you can get for free here: Torn Paper Brushes. You have to download the brushes and then click on your brush tool and load the new brushes. These brushes are HUGE so for my project I scaled the brushes down to about 200 and used the top and the bottom parts of each brush once and then switched brushes so the tear is unique all the way around. To turn the brush sideways, open your brush options and just adjust the orientation.
- After the edges are to you liking, right-click on the layer in the layer selection and pick "Blending Options." In that menu you can add a drop shadow, which gives a little more dimension to the image. There are some paint smears on this example, but here is essentially what you should see:

Negative Space Graffiti/Paint Splatter Name Plate
- To put "Steve's Stuff" on there, I downloaded a free font (Serial Publication) and another free brush set: Splatter Brushes and Serial Publication Font
- Change your foreground/background colors back to black/white.
- Create a new layer and use your text tool with your font selected to type your text using white as your foreground. You want to use a good contrast to whatever your paint splashes will be. Move the text around to where you will want it on the finished product.
- Create a new layer for your paint splashes. Using a regular brush (circle or square is fine) use black to cover the white text. You want to make sure it is completely covered.
- Switch your brush to one of the splatter brushes. Again, you'll want to resize to something that makes sense. Then, switching brushes pretty frequently so there isn't a lot of repeat, go around the square so that the edges are more artistic looking and less "I made this on paintbrush."
- While still in the "black" layer hold ctrl or command and click on the THUMBNAIL of the text layer. You should see the selection of the outline of your letters on the black now. Press Delete or Backspace and viola, negative space.
- At that point you can either delete the text layer or you can just click on the eye to remove it from view in case you want to bring it back later for some reason.
- I also used a coffee cup stain brush on the side because I thought it was funny. I will link to that below the example:
 Here is the link for the coffee stains (make sure you change the color a little for each ring so that the overlaps look like they are from different times/materials): Cup Stain Brushes
Digital Vellum with Embellishments
This is ridiculously easy, but still has a few steps, so here we go:
- Create a new layer.
- Draw a white filled-in rectangle and change the opacity of the layer to 60%.
- Right-click on the layer and go to "Blending Options." You want to add a drop shadow.
- Now it looks like vellum. For my header, I added another text layer with a subtitle.
- For the steampunk gears, I created a new layer for each gear and used this free brush to make gears of different sizes: Steampunk Brushes.
- After you put the gears where you want them, create a new layer and then follow the directions HERE to create a layer of "rust."
- Change the style to "overlay."
- While still on the "rust" layer, Ctrl or Command click each of the thumbnails of the layers where you have gears to select them.
- Press Ctrl or Command + Shift + I to invert the selection and press Delete or Backspace to delete all the other color.
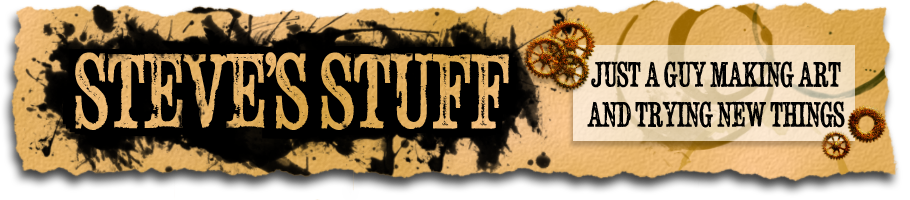
- Then go to each of the gear layers and go into Blending Options to add Bevel and Embossing. I used "Inner Bevel" to make them look a little more 3D. To add a subtle extra touch of depth, I added a drop shadow to the gears that are "layered" on top of each other to make it look like they are stacked. I adjusted the distance to make the shadow bigger the "higher off the page" the embellishments are. Here was the final project:

No comments:
Post a Comment